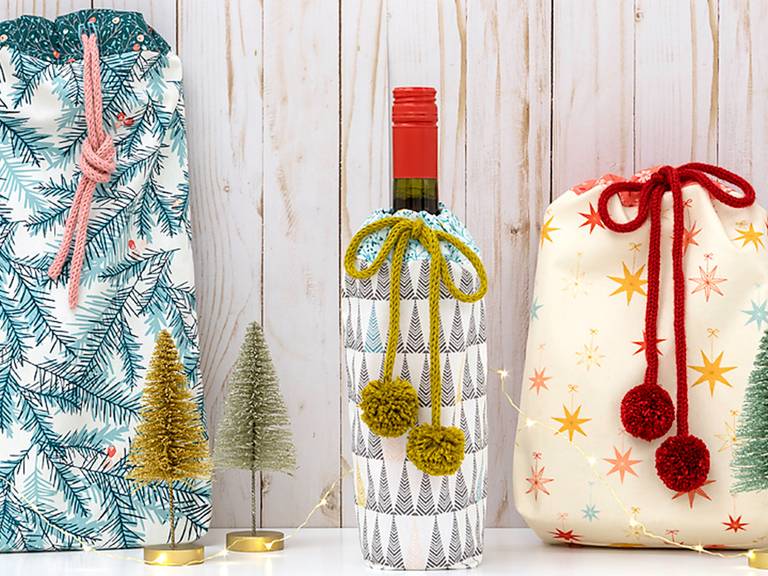
Custom Gift Bags Project

Easy to sew and thoughtful to give, our custom gift bags are tops when it comes to gifting. Use our handy worksheet to calculate the size of each bag based on the gift that will go inside – you can make a variety of bags, each with a unique size and fabric. Finish off your bags with knit I-cord ties and pompoms and you’ve got some great looking gifts! Bonus: the bags are reusable, of course – it’s almost like giving two gifts in one!
Supply List:
- Main fabric – enough to make desired bag size
- Contrast fabric for casing
- Lightweight interfacing
- Yarn – size 1 to 3 for I-cord
- Omnigrid Rotary Cutter
- Omnigrid Cutting Mat
- Omnigrid 6” x 24” Ruler
- Iron and pressing surface
- Dritz Ezy-Hem® Gauge
- Dritz Point Turner & Seam Creaser
- Dritz Mark-B-Gone® marking pen
- Prym Comfort Twist Knitting Mill
- Dritz Ezy-Pull® Bodkin
- Dritz Plastic Sewing Needle
- Prym 2-in-1 Pompom Maker, small
- Scissors
- Custom Gift Bag Worksheet
- Optional: Fray Check™

Step 1: Print out gift bag worksheet. Use to measure your gift and determine the fabric cut sizes for your custom gift bag.

Step 2: Using Omnigrid ruler, cutter, and mat, cut 2 bag pieces from bag fabric, 2 casing pieces from casing fabric, and 2 casing pieces from interfacing. If main fabric is light or see-through, you may want to line the bag. Cut 2 pieces of lining the same size as main fabric. Place lining pieces on wrong side of main fabric and treat as one. TIP: Basting around the edges will help keep pieces together. Especially if the pieces are large.

Step 3: Press casing pieces in half lengthwise, wrong sides together. Place interfacing along fold on wrong side of casing fabric pieces. (If fabric is directional, place interfacing on the side that will be on the outside of the bag.) Fuse interfacing to both casing pieces. Using Dritz Ezy-Hem® Gauge, press long edge of each casing piece, with no interfacing, under ½”.

Step 4: Using a ½” seam allowance, stitch unpressed edge of 1 casing piece to top of 1 bag piece, right sides together. Press seams towards casing. Repeat with 2nd casing and bag pieces.

Step 5: Mark center of front casing on front of bag. Make center mark ½” long and centered on the front casing section. Stitch a buttonhole over mark. (For an easy buttonhole, cut fabric along the mark, remove any marks from marking pen, and secure edges of hole with Fray Check™.)

Step 6. With right sides together and ½” seam allowance, stitch bag and casing pieces together along sides and bottom of gift bag. If desired, stitch a boxed corner on gift bag. Align stitch lines of bottom edge and side together at each corner. To draw stitching line, move ruler down stitched line until total measurement from edge to edge is the same as the package depth. Draw a line along edge of ruler. Stitch along drawn line and trim away excess fabric. Turn bag right side out. Use point press to push out corners. Press stitched edges at top bag.

Step 7: Fold casing down, with pressed seam to inside of casing. On outside, edge stitch along casing to secure all layers.

Step 8: Using Comfort Twist Knitting Mill, make I-cord the width circumference + 18”.

Step 9: Use bodkin to thread I-cord through casing. Finish ends of I-cord by running yarn end through stitches. Pull tight and take a few stitches to secure. Do not trim excess yarn yet.

Step 10: Make 2 small pompoms with orange disks on 2-in-1 pompom maker. For 1” pompoms, do not wrap the maker completely full. This will allow you to tie the pompoms tightly and trim down to about 1”. Using excess yarn at each I-cord end, attach pompoms to cord ends.

Step 11: Place gift in bag and tie I-cord to close bag.

The recipients of your gifts will be as delighted with the fabric gift bag as they are with what’s inside! Gift bags can be repurposed in many ways – to house cosmetics, jewelry, hair accessories, sewing or office supplies … you name it. It truly is the gift that keeps on giving!


